The First Sign of Failure

The First Sign of Failure

The First Sign of Failure

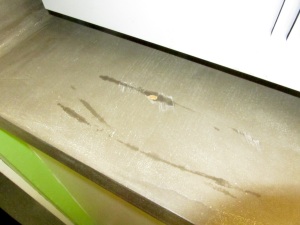
There it is.  The first sign of failure in the beautiful ardex countertops.

(Click that image and it’ll enlarge, by the way)

The criminal?  The George Foreman drip tray.  It got sat there and forgot about for a day or so.  When I finally realized it and picked it up , it left behind that huge stain and those holes.

I know its gross that a drip pan of grease sat there for any amount of time and that plenty of people will judge us for being disgusting, but I am just keeping it real.  I am sure there are plenty of people out there that wish they were more OCD about picking things up and are in the same boat as we are.  If thats you and you are reading this and still thinking, but I’ll just BE super cautious about these because I want them so badly.  Stop.  I did that.  I was super cautious.  I was constantly wiping things up as soon as they touched the concrete.  It still happened.  The good thing is I now wipe countertops constantly even though I ripped the concrete out.  So maybe if you want to train yourself that way, you SHOULD do this, but expect to be redoing it in two months.

That hole and stain up there was within 2 weeks.  We hadn’t even gotten around to doing the rest of the countertops yet and that one already had to be chipped and patched and resealed.


Moral of the Story.

Not worth it.


Not everything you read online is a good idea.

This and other amazing insight.

Brought to you by… Ardex Countertops.


I haven’t been blogging lately because my spirit was crushed.

I am so dramatic.

When we bought this house, my eyes lit up with the possibilities.  I was so excited to tackle every single project the moment we were handed the keys.  I just wanted to dive in head first and not even check the water depth first.  A year in and my enthusiasm was yet to bend.  Then came the ardex kitchen countertops.

We started renovating our kitchen to give it a quick pick me last June.  We just wanted to put some lipstick on a pig and be satisfied with it until we could gut it and set it up better.  I just wanted it to look pretty while I had to live with it.  When we moved in, it was filthy.  So gross.  It looked like somebody had murdered a marinara monster and it’s marinara guts had sprayed everywhere.  Everywhere.  Inside of cabinets, under the countertop.  Everywhere.  It was filthy.

So we started by stripping and painting the solid wood cabinets.  Great start.  It didn’t go smoothly.  If I were to do it over again, I would have used different primer. But that was last year and they have held up great.  I’ve touched up a couple spots, but they’re seriously in great shape.  Maybe I’ll post pics of that soon.  Let me get to that.

We knew we also wanted to paint the walls (obviously), replace the floor, and do something with the disgusting pink countertops.

As you know from the blog, the floors went perfectly.  Everything went down quick and easy and they turned out beautifully.  They’re still one of my favorite things in this house – if not THE favorite.

But the countertops.  Ugh.  The countertops that killed my blogging sharing spirit.  The paint we knew wasn’t going to work.  We just knew it.  $20 and your countertops are gorgeous?  Ha. Ha. Ha.  Even before we decided to “just try it” – I had my heart set on concrete.  I had all of the tutorials pinned on how to pour your own or the -ohlala- “quick and easy and cheap” alternative of just skimming on some concrete topper known as Ardex Feather Finish.  But I agreed to try the painting first and as soon as it chipped up I swooped in with PLEASECONCRETEPLEASE JUSTPLEASTLETSTRY IT.  The hubs reluctantly agreed and I ran to the nearest supply store and ran back with my $20 bag of feather finish.

We tried it first on an old laminate shelf we weren’t using anymore.  We could NOT get it to seal.  It looked gorgeous but we test spilled all kinds of stuff on it and all kinds of stuff stained it.  I was convinced we were sealing it wrong and switched the sealant out AND bought some food-safe wax.  Flipped it over and started the experiment anew.  New application of feather finish, new sealant, new waxing.  Spills and spills and everything was fine.  Hubs again reluctantly gives in (It has to be hard arguing with a lawyer) and we rip the painted laminate off of the countertop and start applying.

I posted some pics of the during process and then nothing more.

And you know why?  Because it was a miserable, terrible, horrid failure.

OK now I am really being dramatic.  It wasn’t that bad, but I do regret doing it.

Immediately it started staining.  Let me stop right there.  I put NO LESS than 4 coats of concrete sealant on these THEN wax.  By all definitions they should’ve been sealed.  However, that didn’t help.  The first disaster was the tray from a George Forman grill left a nice ring that DID NOT come out.   I love the natural “patina” of concrete, but that was ridiculous.

Then we left for a few days and came back to find that we had missed some water behind the faucet and it had got under the concrete and swelled and exploded.  It looked like the sink had a tumor.  THere was a giant hole.  It was not a fun argument getting home at 11 at night on a work-night and finding a hole in the countertops we had just done 8 whole weeks ago.

So it broke me.  I was disappointed and frustrated and was sick of working and redoing a kitchen that I swore was going to be 3 leisurely months and done.  But instead we’re into a year later and STILL devoting most of our time to this kitchen.

So that’s why I’ve been absent.  It’s not that we haven’t worked on other rooms.  It’s that I was frustrated and done sharing for awhile. I just didn’t have it in me.

So what’s changed?  We redid the countertops again over the weekend.  For the THIRD time.  And final time.  Because this time we didn’t take shortcuts or try some “quick and easy” tip we found on one blog that NEVER mentioned it again.  We bought a sheet of laminate for $90 and my husband and his dad relaminated the countertops.  I opted out because of previously mentioned feelings of self defeat.  But they’re done and ready to be installed and they’re beautiful.  They are leaps and bounds better looking than the concrete was on it’s best day.  People judge laminate.  But its a beautiful, durable, affordable option.  And I am really excited to blog about this kitchen and whole house again.. because those laminated countertops have restored my enthusiasm.  And I needed that.  I finally feel like sharing again.


The Ceramic Womb

…is what we call our “master bathroom.”

Here’s a funny anecdote.. if you google image search “Master bathroom,” this is what you come up with:

Google Img Master Bath

Don’t believe me?  Go ahead, click it.

For the record, most of those gigantic bathrooms are actually bigger than our entire house.  Who has that kind of space?  Also, what are these people doing in their bathrooms?  Hosting parties?  Exactly how many people are in this bathroom at any given time? The entire Duggar family?  I digress.

Here is our “master bath” from our first tour of our home —

Master Bath

“Master” Bath

The wood on each side of that picture is the molding framing in the sliding pocket door (can I just say I love pocket doors?).  Then, following the picture in from the left, you see the glass shower door the pink wall of the shower, and the grey toilet.  In the far right of the picture, just before the pocket door molding for the other side, you see the pedestal sink peeking out.  It’s a little hard to tell in two dimensions, but between the shower wall in the middle of the picture and the edge of the sink, is just enough room to slide through sideways to the toilet.  It is cramped to say the least. In the almost year (holy smokes) that we’ve lived here, we’ve both showered in this room one time each.  It is very cramped.  Also, I am sure you’ve noticed by now that the entire thing is pepto pink.  I want you to be assured that the inside of the shower is as well.  Every surface inside that shower – floor, ceilings, and every wall – is also this pink tile.  Thats why we call it the ceramic womb.  It is awful.

We have big plans for this bathroom, but I’ll get to that soon, this post is already getting huge just enjoying the sights.  Let’s just say, hubs went all hulk smash! on the thing and it no longer has a shower or 4 walls.

This slideshow requires JavaScript.

Stay tuned!

New Rug!

Our living room is coming along…  Here’s an update of how it looks as of today!

This slideshow requires JavaScript.

All that junk on the sofa table?  Just keeping it real.

But the living room has made a lot of progress.  We’d like to thank Kev’s parents for the beautiful blue rug.  It was our Christmas gift.  If you’d like it, it is the moroccan trellis rug in Blue on Overstock.com.  We got it on a sweet Black Friday deal.

You can also see that the artwork above the fireplace is now mounted and the houseplants are gone…because we killed them.  Whoops.  We had no real great place we liked them in this house so I guess it doesn’t really matter.  Poor planties.  I also switched the position of the chair & tiny table & switched it out with another lamp we had in another room.  I like it better this way, but I have to shim up the other leg of the chair so its stop wobbling (only one leg is on the rug).

The Living Room POA-

Here’s the living room plans-

  • Paint fireplace grate
  • Buy new curtains
  • Possibly buy a new more fashionable blind
  • Buy an area rug
  • Box out the hidden windows
  • Probably buy a new couch
  • Build built-ins on each side of the fireplace that are mantel height & the TV can be hidden in
  • Paint the trim glossy white
  • Paint the front door
  • Mount the artwork (I made that) above the fireplace
  • Pare down on the houseplants.  (actually we accidentally killed them.. so that was an easy step…unfortunately)

I’ve actually bought a couple different pair of curtains to try out here and haven’t made a decision yet.  They’re probably all going back to the store.  We also picked out a huge (96in) bamboo shade on discount from Home Depot the other day as well.  I am hoping to get that hung up in the near future.  When I go into the living room now I feel really at home.  It’s starting to feel warm and inviting instead of just a mishmash of things thrown in there that we already owned.  We haven’t really bought a lot for it, but the little adjustments make it feel more intentional than its previously thrown together.  Happy home.

Happy New Year everybody!

Happy New Year!

Happy New Year!

I am writing this post in advance so it is sure to go up, but if all goes well yesterday we should have attended Kevin’s first ever Steelers game!  I just want to take the time to wish everybody a safe and happy new year.  Have a wonderful time out there tonight, to everybody near and far.  Cheers to you and to 2013.

Windows!

Back here, I remarked that a certain loved father-in-law of mine promised me he’d help us oust the blocked in windows that are to either side of our fireplace.

The man came through.

Way more beautifully than anybody could have hoped.  That’s not to say we had low expectations of him, that’s to say he does beautiful work.

In Laws revealing the windows

In Laws revealing the windows

Windows boxed up so we can paint the trim.

Windows boxed up so we can paint the trim.

Revealed!

Revealed!

So I know these have Christmas decorations in them so it sort of distorts it. BUT… Its tradition that I put my tree up on Black Friday while the rest of the Country is out pulling each other’s hair out and generally forgetting the values of the day before.  So I had to do it.  I hate breaking tradition.


But regardless…. HOW AMAZING DO THOSE WINDOWS LOOK?

Thanks again to my in laws… they are endless and incredible help!  Looks so amazing.


Best Foot Forward

I walk like a dude.  I walk heavily.  I walk not lady like.  I also have a career path that requires me to wear high heels on occasion and on every one of those occasions I stomp around like Godzilla.   Needless to say, I go through a lot of heel tips.  In the past, that meant shoes to the trash.  Then I found out you can buy new tips and replace them yourself.  I watched plenty of videos.  I found out Target sells 3 or 4 sets of new tips for about $5.  I was on board.  I was.

Just let the man do it.


It’s not as easy as it sounds.  Or maybe it would be if I had tried it earlier on in the actual carnage of my heel tip.  The truths is I had worn the tips down so far they would not come out.  Kevin successfully got them out of one heel, but not its twin.  So I really have no update other than DO THIS BEFORE YOUR TIP IS COMPLETELY GONE.  Has anybody ever successfully replaced their heel tips?  Any tips on replacing tips?  Seriously, I want this to work on the new shoes I just bought.  I threw all the old ones out in frustration.  Poor girl with new shoes.  Boohoo.


Saving Money on “Details”

I am obsessed with Restoration Hardware.

I am obsessed with window shopping at Restoration Hardware.

I browse the website and I get all these big ideas and then I say out-loud to nobody in particular “WHO CAN AFFORD THIS?”

Case in point… my obsession with the “Aubrey” pull.  It’s glorious in it’s simplicity.  Not over thought or whatever the drawer pull equivalent to “serif” may be… I am a sans serif kind of girl both in font and drawer pulls it seems.  But apparently, simplicity does not come cheap.  The 4 inch satin nickel variety of the Aubrey is $11 a pop.  And I needed 23 of them.  That ends up costing over $250 just for cabinet pulls.  That’s not going to cut it.

So I went to Google and eventually, I ended up here at Ideal True Value webstore.  The picture they included isn’t the best.  You can tell it has sharper lines than the Aubrey and I was immediately drawn to them.  It’s even cooler in my book.  And their listed price… $1.44 per pull.  $9.56 less per pull than it’d cost at restoration hardware.  So I ordered 23 of them and paid the $8.99 in shipping and handling.  That brought the final cost per up to $1.83.  Still a whole $9.17 less than the fancy ones.  They came within 3 days.  Heaven.

So how do they look?

Kitchen Cabinet Pulls

$1.83/pp Kitchen Cabinet Pulls

The answer?  Glorious.

Listage-

So here’s where we stand on that checklist of ours:

  • Prime, paint, and seal the cabinets. (we opted to not seal)
  • Buy new hardware and add it to the cabinets (duh)
  • Paint the walls and ceiling
  • Re-do the countertop (either paint or re-laminate)
  • Replace the floor
  • Finally finish installing the big light
  • Replace the under cabinet light
  • Find a permanent solution for the trash and recycle bins (on our way!)
  • Make the upper corner shelf open shelving (just have to add the shelves back in – more on that later)
  • Possibly replace the above-window light
  • Add some sort of curtains to the window and the door
  • Strip and repair the doors to the outside and to the basement
  • Paint the doors to the outside and the basement
  • Bright high glass white paint on the trim
  • Create a family command center on the big open wall that includes a calendar, mail center, meal planner, and anything else we may find useful.
  • Decorate.
  • Enjoy.