Oven BackSplash Fancying.

I loved looking at pictures at fun backsplashes behind ovens.  Something beautiful to stare at while cooking.  I wanted that.  I didn’t want to rip out my backsplash though and spend money on a non-essential on a kitchen reno that has gone on months longer than expected.

So I came up with my own clever idea… or well I think it’s clever.  Toot toot on that own horn.

This slideshow requires JavaScript.

(I wish I could figure out how to make that slideshow go faster… but I can’t I am sorry.  BOO ME)


For those interested, thats a photo I found online of where my husband proposed.  So it’s both a really beautiful photo and a really great memory all in one.


The First Sign of Failure

The First Sign of Failure

The First Sign of Failure

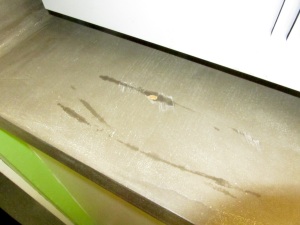
There it is.  The first sign of failure in the beautiful ardex countertops.

(Click that image and it’ll enlarge, by the way)

The criminal?  The George Foreman drip tray.  It got sat there and forgot about for a day or so.  When I finally realized it and picked it up , it left behind that huge stain and those holes.

I know its gross that a drip pan of grease sat there for any amount of time and that plenty of people will judge us for being disgusting, but I am just keeping it real.  I am sure there are plenty of people out there that wish they were more OCD about picking things up and are in the same boat as we are.  If thats you and you are reading this and still thinking, but I’ll just BE super cautious about these because I want them so badly.  Stop.  I did that.  I was super cautious.  I was constantly wiping things up as soon as they touched the concrete.  It still happened.  The good thing is I now wipe countertops constantly even though I ripped the concrete out.  So maybe if you want to train yourself that way, you SHOULD do this, but expect to be redoing it in two months.

That hole and stain up there was within 2 weeks.  We hadn’t even gotten around to doing the rest of the countertops yet and that one already had to be chipped and patched and resealed.


Moral of the Story.

Not worth it.


Not everything you read online is a good idea.

This and other amazing insight.

Brought to you by… Ardex Countertops.


I haven’t been blogging lately because my spirit was crushed.

I am so dramatic.

When we bought this house, my eyes lit up with the possibilities.  I was so excited to tackle every single project the moment we were handed the keys.  I just wanted to dive in head first and not even check the water depth first.  A year in and my enthusiasm was yet to bend.  Then came the ardex kitchen countertops.

We started renovating our kitchen to give it a quick pick me last June.  We just wanted to put some lipstick on a pig and be satisfied with it until we could gut it and set it up better.  I just wanted it to look pretty while I had to live with it.  When we moved in, it was filthy.  So gross.  It looked like somebody had murdered a marinara monster and it’s marinara guts had sprayed everywhere.  Everywhere.  Inside of cabinets, under the countertop.  Everywhere.  It was filthy.

So we started by stripping and painting the solid wood cabinets.  Great start.  It didn’t go smoothly.  If I were to do it over again, I would have used different primer. But that was last year and they have held up great.  I’ve touched up a couple spots, but they’re seriously in great shape.  Maybe I’ll post pics of that soon.  Let me get to that.

We knew we also wanted to paint the walls (obviously), replace the floor, and do something with the disgusting pink countertops.

As you know from the blog, the floors went perfectly.  Everything went down quick and easy and they turned out beautifully.  They’re still one of my favorite things in this house – if not THE favorite.

But the countertops.  Ugh.  The countertops that killed my blogging sharing spirit.  The paint we knew wasn’t going to work.  We just knew it.  $20 and your countertops are gorgeous?  Ha. Ha. Ha.  Even before we decided to “just try it” – I had my heart set on concrete.  I had all of the tutorials pinned on how to pour your own or the -ohlala- “quick and easy and cheap” alternative of just skimming on some concrete topper known as Ardex Feather Finish.  But I agreed to try the painting first and as soon as it chipped up I swooped in with PLEASECONCRETEPLEASE JUSTPLEASTLETSTRY IT.  The hubs reluctantly agreed and I ran to the nearest supply store and ran back with my $20 bag of feather finish.

We tried it first on an old laminate shelf we weren’t using anymore.  We could NOT get it to seal.  It looked gorgeous but we test spilled all kinds of stuff on it and all kinds of stuff stained it.  I was convinced we were sealing it wrong and switched the sealant out AND bought some food-safe wax.  Flipped it over and started the experiment anew.  New application of feather finish, new sealant, new waxing.  Spills and spills and everything was fine.  Hubs again reluctantly gives in (It has to be hard arguing with a lawyer) and we rip the painted laminate off of the countertop and start applying.

I posted some pics of the during process and then nothing more.

And you know why?  Because it was a miserable, terrible, horrid failure.

OK now I am really being dramatic.  It wasn’t that bad, but I do regret doing it.

Immediately it started staining.  Let me stop right there.  I put NO LESS than 4 coats of concrete sealant on these THEN wax.  By all definitions they should’ve been sealed.  However, that didn’t help.  The first disaster was the tray from a George Forman grill left a nice ring that DID NOT come out.   I love the natural “patina” of concrete, but that was ridiculous.

Then we left for a few days and came back to find that we had missed some water behind the faucet and it had got under the concrete and swelled and exploded.  It looked like the sink had a tumor.  THere was a giant hole.  It was not a fun argument getting home at 11 at night on a work-night and finding a hole in the countertops we had just done 8 whole weeks ago.

So it broke me.  I was disappointed and frustrated and was sick of working and redoing a kitchen that I swore was going to be 3 leisurely months and done.  But instead we’re into a year later and STILL devoting most of our time to this kitchen.

So that’s why I’ve been absent.  It’s not that we haven’t worked on other rooms.  It’s that I was frustrated and done sharing for awhile. I just didn’t have it in me.

So what’s changed?  We redid the countertops again over the weekend.  For the THIRD time.  And final time.  Because this time we didn’t take shortcuts or try some “quick and easy” tip we found on one blog that NEVER mentioned it again.  We bought a sheet of laminate for $90 and my husband and his dad relaminated the countertops.  I opted out because of previously mentioned feelings of self defeat.  But they’re done and ready to be installed and they’re beautiful.  They are leaps and bounds better looking than the concrete was on it’s best day.  People judge laminate.  But its a beautiful, durable, affordable option.  And I am really excited to blog about this kitchen and whole house again.. because those laminated countertops have restored my enthusiasm.  And I needed that.  I finally feel like sharing again.


Here. We. Go.

This slideshow requires JavaScript.

On Sunday, I took Kevin to his first regular season NFL game.  We bought the tickets before the season started, so it was before we realized it’d be two teams out of the playoffs.  But we still had a great time!  (I didn’t know the Steelers could not be in the playoffs?? how is that possible?  ugh.)  I am bummed because these circumstances means Kev still didn’t get the complete experience as the stadium was half empty and mostly quiet.  My favorite part about going to games is how loud it is and how the crowd overcomes you.  But any game I get to go to feels like the super bowl to me.. so it was still an amazing time!

Windows!

Back here, I remarked that a certain loved father-in-law of mine promised me he’d help us oust the blocked in windows that are to either side of our fireplace.

The man came through.

Way more beautifully than anybody could have hoped.  That’s not to say we had low expectations of him, that’s to say he does beautiful work.

In Laws revealing the windows

In Laws revealing the windows

Windows boxed up so we can paint the trim.

Windows boxed up so we can paint the trim.

Revealed!

Revealed!

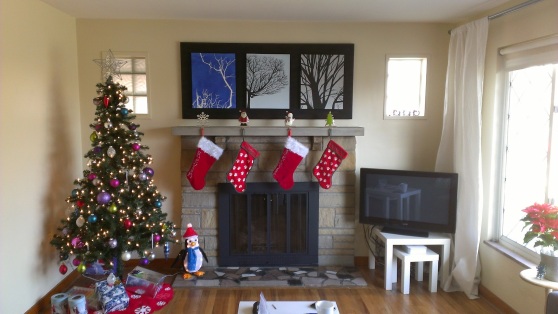
So I know these have Christmas decorations in them so it sort of distorts it. BUT… Its tradition that I put my tree up on Black Friday while the rest of the Country is out pulling each other’s hair out and generally forgetting the values of the day before.  So I had to do it.  I hate breaking tradition.


But regardless…. HOW AMAZING DO THOSE WINDOWS LOOK?

Thanks again to my in laws… they are endless and incredible help!  Looks so amazing.


Then & Now – Living Room Edition

The end of November & beginning of December brought a lot of rapid fire changes to the living room area.  It was an area that basically remained stagnant from when we finished the painting and ripping up the floor.  We filled it with furniture we already owned and went on with life.

Here’s what it looked like at our first walk thru.  When we “fell in love” with our diamond in the rough.

Living room - February 2012 (before we bought our home)

Living room – February 2012 (before we bought our home)

Gross carpet, ugly blinds, brassy fireplace cover. But also- beautiful fireplace, huge window, great bones.

Now here it is on Thanksgiving Day 2012 (about 9 months later)

Living Room on Thanksgiving 2012

Living Room on Thanksgiving 2012

So what’s changed in the last 9 months?  Well the obvious – it’s been painted and the carpet was ripped out.  We put our own furniture in it.  But also, Kevin used high heat paint (its actually marketed for a grill – Rustoleum makes it) in flat black to paint the fireplace cover.  How much better is that?  Seriously amazing.

We have a lot of plans for this space.  All in all from the wall in the left of the photo to the window is about 12 feet.  From the fireplace to the wall that I am standing beside when I took this picture is either 19 or 20 feet.  I don’t remember exactly.  So with where the couch is the living room is about 12×10 roughly.

Here’s the living room plans-

  • Paint fireplace grate
  • Buy new curtains
  • Possibly buy a new more fashionable blind
  • Buy an area rug
  • Box out the windows hidden in this photo
  • Probably buy a new couch
  • Build built-ins on each side of the fireplace that are mantel height & the TV can be hidden in
  • Paint the trim glossy white
  • Paint the front door (can’t see it here)
  • Mount the artwork (I made that) above the fireplace (it’s just leaning in this picture)
  • Pare down on the houseplants.  (actually we accidentally killed them.. so that was an easy step…unfortunately)

It’s basically a whole whole bunch of buying.  So that’s why it’s coming along slowly.

Luckily though, a lot of this list was knocked off over Thanksgiving weekend… Thanks Billionaire (thats what I call my father-in-law, Bill)!

Let there be light!

One of the things on kitchen-checklist-mania is to replace the undercabinet light that is above the sink.  It’s not a terrible light persay.  It’s great to have light there.  However, it is disgusting and dirty and while I could probably scrub it clean, it hums.  The humming is mindnumbing and drives me insane.  So the fix?  Kevin replaced it with an IKEA light we had hanging in our super dark apartment closet before we bought this house.  It’s just been hanging out on the floor of our basement.  So free fix!

Under-cabinet Light

Under-cabinet Light

I know that’s a ridiculously exciting picture… but it’s actually quite nice to be able to turn on a light there and not immediately regret it.  The little things!  Let there be light! Pun Pun Pun!

Update:

  • Prime, paint, and seal the cabinets. (we opted to not seal)
  • Buy new hardware and add it to the cabinets (duh)
  • Paint the walls and ceiling
  • Re-do the countertop (either paint or re-laminate)
  • Re-redo the countertop again (surprise surprise!)
  • Replace the floor
  • Finally finish installing the big light (it needs a sealing gasket thing installed, but we couldn’t find it for awhile lol)
  • Replace the under cabinet light
  • Find a permanent solution for the trash and recycle bins (on our way!)
  • Make the upper corner shelf open shelving (just have to add the shelves back in – more on that later)
  • Paint the new open shelving in the corner
  • Possibly replace the above-window light
  • Add some sort of curtains to the window and the door
  • Strip and repair the doors to the outside and to the basement
  • Paint the doors to the outside and the basement
  • Bright high gloss white paint on the trim and doors
  • Create a family command center on the big open wall that includes a calendar, mail center, meal planner, and anything else we may find useful.
  • Add a light in the little nook where the doors are?
  • Decorate.
  • Enjoy.

Ceiling Changes

The initial plan (as you can see here by the paint samples on the ceiling) was to paint the walls and the ceiling in the kitchen the same color.  We used the technique in our bathroom reno (here) to make the space feel taller and bigger.  However, we ended up choosing a bright (I say cheerful) shade of green and felt that having it on the ceiling would be too much.  Also, a white ceiling will help our dark kitchen appear even brighter than ever.   So on the white ceiling paint went.

Kevin Painting the Ceiling

Here’s Kevin cutting in the paint in the little nook.  The door in front of him is the door to our patio and the unpainted door behind him is the door to the basement.  The kitchen floor actually steps down in this little two-door nook, so thats why Kevin is doing the cutting in here.  I can’t reach – even on the step stool – and I don’t do ladders.  So everywhere else it was business as usual – me cutting in and Kevin rolling.  We didn’t bother taping off because the walls were the next to be painted.  We were just extra careful to not get any paint on the cabinets or countertops (we covered those up) and we taped off the big ceiling light.

Here’s a before & after.  Look at all that reflecting light! Yum!

Before & After Ceiling Paint

Before & After Ceiling Paint

So yesterday’s post didn’t update the checklist, so lets have at that.

  • Prime, paint, and seal the cabinets. (we opted to not seal)
  • Buy new hardware and add it to the cabinets (duh)
  • Paint the walls and ceiling
  • Re-do the countertop (either paint or re-laminate)
  • Re-do the countertop AGAIN (surprise!)
  • Replace the floor
  • Finally finish installing the big light
  • Replace the under cabinet light
  • Find a permanent solution for the trash and recycle bins (on our way!)
  • Make the upper corner shelf open shelving (just have to add the shelves back in – more on that later)
  • Possibly replace the above-window light
  • Add some sort of curtains to the window and the door
  • Strip and repair the doors to the outside and to the basement
  • Paint the doors to the outside and the basement
  • Bright high gloss white paint on the trim
  • Create a family command center on the big open wall that includes a calendar, mail center, meal planner, and anything else we may find useful.
  • Decorate.
  • Enjoy.

It’s coming along.. and needed some updating now that we have to re-redo the countertops.  Progress is progress!

Rustoleum Countertop Paint

I read up a lot on Rustoleum countertop paint.  I hated the idea of it.  Well, that’s not entirely true.  I loved the idea of slapping paint down on a countertop that is pink and dirty and disgusting and it suddenly looking lacquered and beautiful and flawless.  I hated the idea that it didn’t live up to its promises like a high school boy.  Every thing I read said either you needed to seal it or it’d let you down in a heart beat.  Buttttttt sometimes people…sometimes I… don’t listen.  Kevin & I went back and forth on it for a few weeks (probably longer) and had initially said no, we aren’t going to waste our time, let’s just re-laminate them.  But we got to looking at prices of laminate and delivery costs.  We determined we couldn’t just buy a cheap countertop because of the awkward corner sink area.  We’d have to rip off the old laminate and put down a new sheet on top of it.  We’d have to buy a gigantic sheet so there wasn’t a seam.  It started to seem like a whole lot of work and money to drop on laminate.  So we decided, hey for $20 this countertop paint can’t really be a complete waste of time.  So what if it only lasted 6 months?  In that time we could save up and come up with a different idea for the countertops.

The bad news?   It lasted just days before it got dinged up.  The good news?  Even with how dinged up it is, it was still “good enough” that we got rid of the pink dirt and came up with a better idea (but more on that later).

It’s now December.  We actually painted these countertops in early September.  Over 2 months ago.  So I feel like 2 months is a good “use time” that I can give you a fair review of my thoughts.

Let’s start with how we did it.


Countertop Painting


So yeah.. that’s it.  Seriously there isn’t much to it.  Just move quick and try not to pass out from the smell.. Actually do as I say not as I do and wear face masks n’at ’cause that stuff smells like you are swimming in nail polish.  Which every time I mentioned that Kevin said, “well thats basically what it is.”  I get it, Kevin.

So what’s my beef with the countertop paint?

It’s cure time is ridiculously long.  Yes, I know the can says just a few days, but they lie.  We painted this on a Wednesday evening & got up Thursday and left town until Sunday.  We didn’t touch it until Monday evening.  So it cured LONGER than the minimum.  And it chipped as soon as we sat something down on it.  Kevin brewed coffee & sat it down on the countertop & it left a ring here it had melted the paint.  We don’t drink super hot civil lawsuit degree coffee.  It’s just standard heat.  It melted the paint.  Then the rest of the chips came from less-than-standard things… like accidentally dropping a wrench and some other tools in random places.  It chipped it up like crazy.  Then a few weeks later, we sat a chicken on a platter on it and spun the platter to carve and it left a huge scratch in the paint.

HOWEVER – after that first month or so, the paint stopped chipping so badly.  I’d say if you could let this stuff cure for 6+ weeks before touching it, it may just work the way its supposed to work.  I don’t know who has the luxury of not using their kitchen for 6+ weeks, but if that’s you, then this $20 paint should work great for you.

With that said..We haven’t had much problems with it since the chipping stopped a few weeks ago.  It looks crappy now because we did so much damage (I’ll post pictures of that later probably) early on.  So we started brainstorming other ways to redo the countertop.  I’m not sharing just because I don’t want people to try to talk me out of it (I am looking at you, Billionaire).


Small Changes Out Front

…that may some day have flowers.

The last owner(s) of our home had hired a professional landscaper to take care of their grass cutting needs.  The grass was a beautiful emerald green when we took the keys in March.  It was perfectly trimmed and edged without a weed in sight.  That was March… it’s now September (holy crap) and it totally doesn’t look like that anymore.  It was a hot summer and things happen.

In May, we started doing some yard work, itching to get outside and into shorts.  It quickly became evident that this was not the summer of outdoor labor for us as temperatures got to the triple digits here in Western PA.  Naturally, before we realized how hot it was going to be, we started ripping things apart with big plans for beautiful flowers to greet us and our guests.

I mentioned how nice the lawn was.  Key to this story is not the lawn, but the front garden under our big living room window.  It was ugly.  Things weren’t planted right and they definitely were not taken care of properly.  It was a sad story out front and it didn’t make me happy.  Still in my YAY SUMMER mindset, blissfully unaware of how sweaty and miserable I would soon become, I vowed to make it a much more inviting front flower garden.  Here’s the before (from our very first house tour)…

House on First Tour

House on First Tour

Here’s a close up of just the front garden.  It’s a really great picture that I slaved to make sure was the perfect white balance and everything as I am known to do.  Just kidding, I just took the previous picture and cropped it close in on the garden.  Enjoy.

Bush Closeup

Bush Closeup

Photography awards I will not win.

But, as you may possibly be able to see, there wasn’t much to love about this front garden.  Half-dead bushes, no color, no structure, all blah.

I took a shovel and dug up the bushes, most of them were falling apart and dead.  Three of them looked like they may be able to be revived.  The roots of those three bushes were still shaped like a pot so I sprayed them with the waterhose and tried to unclump the dirt around them.  Then I just took them back and planted them around our fence.  Months later, they still look exactly the same, so I don’t think thats a good sign.  Wait, no thats a lie, Kevin mowed over one of them, so two of them look the same, the other is just a stump.

So what did we do with this space?  A whole lot of nothing really.  After ripping the plants out, I started hand-tilling it with a shovel.  Basically, I would just shovel up a clump of dirt and then dump it someplace else, then stab it with the shovel a couple times to break it up.  I did this for about an hour and had managed to move around the dirt in about 3 square feet.  It was exhausting. Then, something was donated by the in-laws…

International Harvester

International Harvester

Yep! A tiller!  It threw Kevin around a lot… I have a video of it, but it was after he had basically gotten the hang of it, so it’s not nearly as entertaining as watching him learn.  This little 3hp workhorse made the job much much easier though.  Soon enough we had freshly tilled soil.  Kevin tilled in some peat and it was soft and lush and beautiful.  The next day, we got to work moving some random stones that weren’t serving any purpose around the back yard, until…VOILA!

New front flowerbed

New front flowerbed

It doesn’t look like much here, but once there is grass around it and some flowers in it, it will look amazing.  That’s right, we started this in May and it’s still empty. Well that’s only kinda true.  The part that is supposed to be grass is full of weeds (we’re awesome).  As for the interior of the bed, Kevin dumped multiple (I think around 5..seriously) boxes of old wild flower seeds into it before we left for vacation.  There may be one flower growing in there now.  It may be a weed.  We bought some gladiolas bulbs to put in it, and the end goal is to have it full of perennials so each year theres beautiful color out front with only weeding+mulching work to be done.  Really, the less work the better.. we kinda have our hands full.

Have you started any projects thinking they’d be quick and easy only to be foiled by the elements?