Kitchen Floor – Tile Colors Used (I THINK)

Finished Floor

Finished Floor

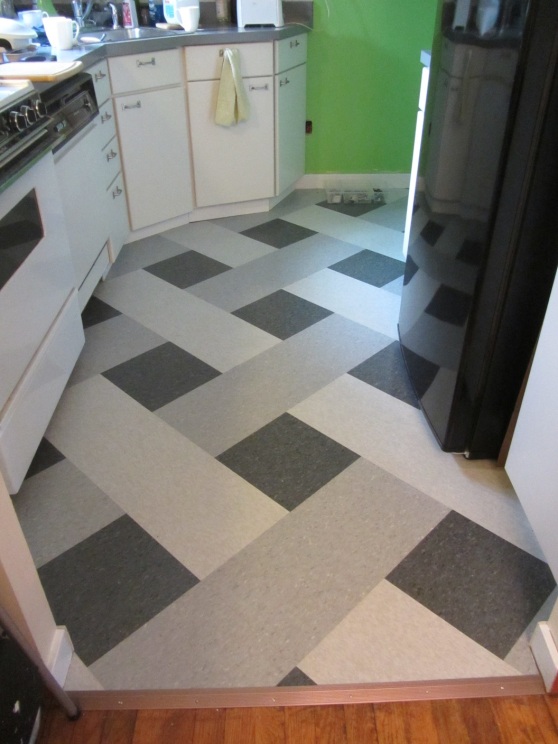
I have gotten a few comments requesting that I share the color of the VCT Tiles.. duh I should have totally thought about that.

I am so bad at this blogging thing.

The problem is that I only have one of the three boxes left downstairs, so I am 100% positive on one of these colors and 95% positive on the other two. I looked at the order on Lowes.com and picked the other two out of the order history and am pretty sure that its right.

So without further adieu… These link to the exact link of them on Lowes that I purchased them from.  Lowes has excellent customer service and are becoming my favorite more and more over HD.

The first one is the one I am for sure about (because I still have the box)-

Armstrong 12-in x 12-in Charcoal Speckle Pattern Commercial Vinyl Tile

Armstrong 12-in x 12-in Charcoal Speckle Pattern Commercial Vinyl Tile


Armstrong 12-in x 12-in Soft Cool Gray Chip Pattern Commercial Vinyl Tile

Armstrong 12-in x 12-in Soft Cool Gray Chip Pattern Commercial Vinyl Tile


Armstrong 12-in x 12-in Shadow Blue Speckle Pattern Commercial Vinyl Tile

Armstrong 12-in x 12-in Shadow Blue Speckle Pattern Commercial Vinyl Tile


Also, I wanted to take the time to thank everybody for the feedback about the kitchen.  It’s very inspiring to keep working.  I’ve been so busy and I haven’t quite got there, but I am truly trying.  Thanks for the encouragement!

Windows!

Back here, I remarked that a certain loved father-in-law of mine promised me he’d help us oust the blocked in windows that are to either side of our fireplace.

The man came through.

Way more beautifully than anybody could have hoped.  That’s not to say we had low expectations of him, that’s to say he does beautiful work.

In Laws revealing the windows

In Laws revealing the windows

Windows boxed up so we can paint the trim.

Windows boxed up so we can paint the trim.

Revealed!

Revealed!

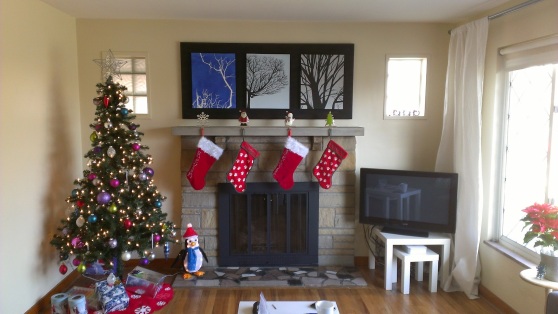
So I know these have Christmas decorations in them so it sort of distorts it. BUT… Its tradition that I put my tree up on Black Friday while the rest of the Country is out pulling each other’s hair out and generally forgetting the values of the day before.  So I had to do it.  I hate breaking tradition.


But regardless…. HOW AMAZING DO THOSE WINDOWS LOOK?

Thanks again to my in laws… they are endless and incredible help!  Looks so amazing.


Gross Grout

5 people read my blog on a regular basis.  Five.  I spell it out so you know that’s not a typo.  You, one of the five.  So it’s really silly that I type this like it’s some sort of big shot blog, but I like to cover my bases.  With that said, nobody paid me for this post or any other (seriously though, where do I sign up for that?  Cash money.)   Not a dime is made from this blog.  I actually make negative money when you think about the time I put into it means time I am not getting paid for my actual real job.

Rejuvenate White Grout Restorer Marker Pens

Rejuvenate White Grout Restorer Marker Pens

You may have heard me say the word gross..or disgusting.. or dirty before in reference to our house and specifically in reference to our kitchen.  We love our little first home.  It gets more perfect everyday.  However, it really was filthy when we moved in and some things refuse to come clean.  Like the white grout in our kitchen.  So one day early on after moving in I was in our Second Home (Depot) and discovered these bad boys right here.

They’re about $6 for two of them and I love them.  I should tell you I ruined the first one.  Completely utterly destroyed it trying to grasp a technique that works well.  If you have ever used a paint marker, you know something about these.  In fact, I can’t specifically say these aren’t just paint markers marketed for a specific purpose.  I don’t have any inclination of what makes them special to use on grout.  But I bought them and love them and would totally buy them again.

Let me tell you about some tips I picked up while ruining the first marker.

The package says to press in the tip to get the paint flow.  Yes, that’s a great idea.  But a bad idea is to press it into the grout to get the paint to flow.  That will eventually destroy the tip and you will end up like I did with a 3/4 of the way full marker and no tip to use it with.  Luckily I had enough with my second pen and I never ruined it, but learn from me just in case you have much more grout than I do.

I eventually worked out a system.  It consists of finding something that you can stick the pen into when you are using it to store it point down.  Mine was a fancy trivet thing that I don’t use as a trivet.  It has a little hole in it that the capped marker fit perfectly in.

Got your trivet like thing?  Great.  Now, start by cleaning your grout.  Always clean everything.  It sucks, just do it.  I hate cleaning and I did it so you can manage.

Once you’re clean and dry (and so is your grout), then get your pen and some sort of rag you don’t mind ruining.  I happen to have a gigantic pack of lint free cloths that we bought when we painted the cabinets, so I used one of those.

Grab your pen and shake it like a salt shaker shake it like a salt shaker shake it like a salt shaker (I know not a single other line from that song).  Once you are convinced your paint is flowing well, press the tip into the rag gently.  I’d say gently as if you were popping a pimple (just keeping it real) or squeezing a grape, but not like you hate the pen or it threw a drink in your face or perhaps works for Fox News.   You’ll see the paint start flowing out on your cloth.

Once you can visibly see the paint, run the marker gently (don’t press too hard – just hard enough) over the grout either until the paint stops flowing or you’ve done about a square foot of grout.  You don’t want to do too much painting at once because if it dries, you can’t get it off.  As far as running the marker over the grout, I found that dragging it down the tile so that the fibers in the tip weren’t pushed against themselves worked best. To say it another way, if you look at that picture of the hand holding the pen in the product picture – holding the marker like that, drag down, DON’T PUSH UP – NEVER UP, so as to maintain the pen tip.

Now you’ve got your square foot of paint done or however much you just did (hey maybe you don’t listen and you just read random blogs to not follow their advice), put your marker cap back on and place it in your little trivet hole so that the ink can follow gravity towards the tip.  Take your throwaway towel and wipe off the paint that got everywhere but your grout.  I found that if I put light pressure on the rag and just ran it on the grout lines, the paint genuinely stuck to the grout but came off of everything else.  Every once in awhile, I had to focus in and really detail get the paint off the tile. Generally tho, the quick wipe was all I need.

Once you get the paint off the tile, pick the pen up again and give it a couple shakes and then run it over more grout.  You may need to press the tip into the rag every once in awhile, but once I got into the rhythm  I really did not do that often.  I found letting it rest tip down while I cleaned up the excess paint was the most helpful at keeping the process rolling.

Also, I am 27 years old and I still can’t spell rhythm.  Thank god for spell check.

So here’s the side by side I snapped while I was doing the worst part (directly above the st0ve).  The black thing to the top of the pic is our exhaust fan.  The grey is the cabinet to the upper right of the stove.  And just in case I have to point it out, the gross orange is how the grout started out before the paint and the white is the after.  It’s not perfect brand new looking white in these really awful parts like the area in the picture, but I think it still looks pretty incredible.

Grout Side by Side

Grout Side by Side

Not bad for $6 and a couple hours of work.  Granted it’s work that some people would find tedious.  But I think the after makes it gratifying.  I don’t know if I have any parks & recs fans out there in the 5 of you that read this, but if not, really get on that.  Its incredible.  Anyhow, there’s a scene where they have to stuff envelopes and Jerry finds out he’s really relaxed by mundane repetitious tasks.  Me too, Jerry, me too.

I still have a small part of the grout to do in the back corner behind the sink. I just can’t reach it comfortably.  So when we take the sink out (again) to redo the countertops (again), I am going to pop myself up in the sink-hole and get that back part.  Why endure the back and neck pain to do it before then?

So all in all, I seriously seriously recommend these pens.  It’s really gratifying and worth the time.  It’s very easy.  Very affordable.  Just do it!

I’d add the kitchen list & update it.. but this was never on the list so.. bonus! ha


Let there be light!

One of the things on kitchen-checklist-mania is to replace the undercabinet light that is above the sink.  It’s not a terrible light persay.  It’s great to have light there.  However, it is disgusting and dirty and while I could probably scrub it clean, it hums.  The humming is mindnumbing and drives me insane.  So the fix?  Kevin replaced it with an IKEA light we had hanging in our super dark apartment closet before we bought this house.  It’s just been hanging out on the floor of our basement.  So free fix!

Under-cabinet Light

Under-cabinet Light

I know that’s a ridiculously exciting picture… but it’s actually quite nice to be able to turn on a light there and not immediately regret it.  The little things!  Let there be light! Pun Pun Pun!

Update:

  • Prime, paint, and seal the cabinets. (we opted to not seal)
  • Buy new hardware and add it to the cabinets (duh)
  • Paint the walls and ceiling
  • Re-do the countertop (either paint or re-laminate)
  • Re-redo the countertop again (surprise surprise!)
  • Replace the floor
  • Finally finish installing the big light (it needs a sealing gasket thing installed, but we couldn’t find it for awhile lol)
  • Replace the under cabinet light
  • Find a permanent solution for the trash and recycle bins (on our way!)
  • Make the upper corner shelf open shelving (just have to add the shelves back in – more on that later)
  • Paint the new open shelving in the corner
  • Possibly replace the above-window light
  • Add some sort of curtains to the window and the door
  • Strip and repair the doors to the outside and to the basement
  • Paint the doors to the outside and the basement
  • Bright high gloss white paint on the trim and doors
  • Create a family command center on the big open wall that includes a calendar, mail center, meal planner, and anything else we may find useful.
  • Add a light in the little nook where the doors are?
  • Decorate.
  • Enjoy.

Ceiling Changes

The initial plan (as you can see here by the paint samples on the ceiling) was to paint the walls and the ceiling in the kitchen the same color.  We used the technique in our bathroom reno (here) to make the space feel taller and bigger.  However, we ended up choosing a bright (I say cheerful) shade of green and felt that having it on the ceiling would be too much.  Also, a white ceiling will help our dark kitchen appear even brighter than ever.   So on the white ceiling paint went.

Kevin Painting the Ceiling

Here’s Kevin cutting in the paint in the little nook.  The door in front of him is the door to our patio and the unpainted door behind him is the door to the basement.  The kitchen floor actually steps down in this little two-door nook, so thats why Kevin is doing the cutting in here.  I can’t reach – even on the step stool – and I don’t do ladders.  So everywhere else it was business as usual – me cutting in and Kevin rolling.  We didn’t bother taping off because the walls were the next to be painted.  We were just extra careful to not get any paint on the cabinets or countertops (we covered those up) and we taped off the big ceiling light.

Here’s a before & after.  Look at all that reflecting light! Yum!

Before & After Ceiling Paint

Before & After Ceiling Paint

So yesterday’s post didn’t update the checklist, so lets have at that.

  • Prime, paint, and seal the cabinets. (we opted to not seal)
  • Buy new hardware and add it to the cabinets (duh)
  • Paint the walls and ceiling
  • Re-do the countertop (either paint or re-laminate)
  • Re-do the countertop AGAIN (surprise!)
  • Replace the floor
  • Finally finish installing the big light
  • Replace the under cabinet light
  • Find a permanent solution for the trash and recycle bins (on our way!)
  • Make the upper corner shelf open shelving (just have to add the shelves back in – more on that later)
  • Possibly replace the above-window light
  • Add some sort of curtains to the window and the door
  • Strip and repair the doors to the outside and to the basement
  • Paint the doors to the outside and the basement
  • Bright high gloss white paint on the trim
  • Create a family command center on the big open wall that includes a calendar, mail center, meal planner, and anything else we may find useful.
  • Decorate.
  • Enjoy.

It’s coming along.. and needed some updating now that we have to re-redo the countertops.  Progress is progress!

Rustoleum Countertop Paint

I read up a lot on Rustoleum countertop paint.  I hated the idea of it.  Well, that’s not entirely true.  I loved the idea of slapping paint down on a countertop that is pink and dirty and disgusting and it suddenly looking lacquered and beautiful and flawless.  I hated the idea that it didn’t live up to its promises like a high school boy.  Every thing I read said either you needed to seal it or it’d let you down in a heart beat.  Buttttttt sometimes people…sometimes I… don’t listen.  Kevin & I went back and forth on it for a few weeks (probably longer) and had initially said no, we aren’t going to waste our time, let’s just re-laminate them.  But we got to looking at prices of laminate and delivery costs.  We determined we couldn’t just buy a cheap countertop because of the awkward corner sink area.  We’d have to rip off the old laminate and put down a new sheet on top of it.  We’d have to buy a gigantic sheet so there wasn’t a seam.  It started to seem like a whole lot of work and money to drop on laminate.  So we decided, hey for $20 this countertop paint can’t really be a complete waste of time.  So what if it only lasted 6 months?  In that time we could save up and come up with a different idea for the countertops.

The bad news?   It lasted just days before it got dinged up.  The good news?  Even with how dinged up it is, it was still “good enough” that we got rid of the pink dirt and came up with a better idea (but more on that later).

It’s now December.  We actually painted these countertops in early September.  Over 2 months ago.  So I feel like 2 months is a good “use time” that I can give you a fair review of my thoughts.

Let’s start with how we did it.


Countertop Painting


So yeah.. that’s it.  Seriously there isn’t much to it.  Just move quick and try not to pass out from the smell.. Actually do as I say not as I do and wear face masks n’at ’cause that stuff smells like you are swimming in nail polish.  Which every time I mentioned that Kevin said, “well thats basically what it is.”  I get it, Kevin.

So what’s my beef with the countertop paint?

It’s cure time is ridiculously long.  Yes, I know the can says just a few days, but they lie.  We painted this on a Wednesday evening & got up Thursday and left town until Sunday.  We didn’t touch it until Monday evening.  So it cured LONGER than the minimum.  And it chipped as soon as we sat something down on it.  Kevin brewed coffee & sat it down on the countertop & it left a ring here it had melted the paint.  We don’t drink super hot civil lawsuit degree coffee.  It’s just standard heat.  It melted the paint.  Then the rest of the chips came from less-than-standard things… like accidentally dropping a wrench and some other tools in random places.  It chipped it up like crazy.  Then a few weeks later, we sat a chicken on a platter on it and spun the platter to carve and it left a huge scratch in the paint.

HOWEVER – after that first month or so, the paint stopped chipping so badly.  I’d say if you could let this stuff cure for 6+ weeks before touching it, it may just work the way its supposed to work.  I don’t know who has the luxury of not using their kitchen for 6+ weeks, but if that’s you, then this $20 paint should work great for you.

With that said..We haven’t had much problems with it since the chipping stopped a few weeks ago.  It looks crappy now because we did so much damage (I’ll post pictures of that later probably) early on.  So we started brainstorming other ways to redo the countertop.  I’m not sharing just because I don’t want people to try to talk me out of it (I am looking at you, Billionaire).


UHaul as a Resource for more than just Moving Trucks

Let me start off by saying this isn’t a paid advertisement or any of that junk.  I don’t know anybody who works for UHaul, yada yada.  We just recently received our order from UHaul and are really happy with it.  I never knew UHaul offered anything besides trucks, so I wanted to share.  Besides, this is my 4th blog post, do you really think anybody is paying me to write at this point? … Now Carry on.

My husband has been obsessing (possibly too strong of a word) over “Forearm Forklifts” ever since we put an offer in on the our house.  (It’s still weird to say ours at this point.. especially since we haven’t closed, so maybe we shouldn’t at this point.)  I thought he was nuts because I always thought of them as an as seen on tv ripoff.  (Admittedly, I am a sucker for as seen on tv so this is pretty unfair of me.)

He started doing some Googling and it turns out, not only does UHaul rent out moving trucks, but they also have an entire store of moving supplies.  Who knew!?  We sure didn’t.

Kevin ended up ordering two back braces (don’t judge us – better to be safe than sorry!) and a set of Forearm Forklifts (should that be capitalized?  Sounds so formal like it demands to be capitalized).  Things we are sure to put to good use during our big move!

If you are unfamiliar with the Forearm Forklift concept (seriously, it sounds like a wrestling move), basically they are 2 long straps (3′ wide X 9’5″ long) that (according to UHaul) “encourages proper lifting technique” and “requires 66% less work to move objects.”  SCORE!  You are supposed to grab a partner (one of you on each side of the object), feed them under whatever big object you are trying to move, put your arms (up to the forearm, duh) through the holes in the end of the straps, and then coordinate with your partner when you are ready to lift.  Voila!

Kevin found this nifty video from Consumer Reports on YouTube…

Other than the Forearm Forklifts and the back braces, I also noticed that they sell bags for our Queen size mattresses. These are great because they keep the mattress from getting torn!  We’ve used something like this for all but one move, and the one time we didn’t, our (brand new at the time!) mattresses were ripped!

I think it should be noted that the website advertises free shipping on orders over $25 in the continental USA.  Kevin placed our order sometime over the weekend (I *think* Saturday) and it arrived yesterday!  Super fast!  I thought there was a shipping map someplace on the website, but for the life of me I cannot find it right now.  Additionally, if you forget a small thing in your online order (like our mattress bag!) or you prefer not to shop online, you can also pick up these items in a UHaul store!  Just check out the website to find the closest one to you!

Hope this information is useful to you!  Have a great day!