The Sink Tumor that Killed the Concrete Countertops

Sink Tumor

Sink Tumor

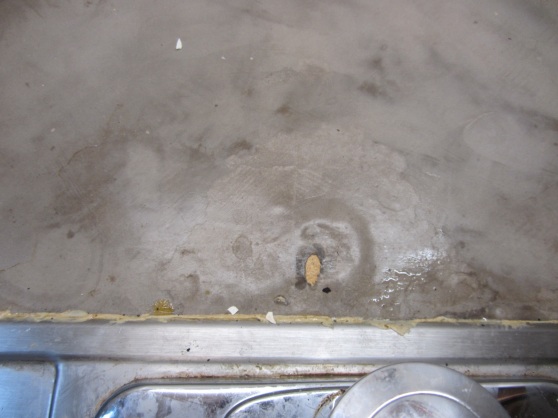
That is probably the grossest picture ever posted on a half-assed blog ever.

(Side note.. google chrome suggested I change grossest to greatest.. so at least I have that going for me)

That’s the picture of the sink tumor that we came home to late one Sunday night in June.

We had both been gone for the weekend on different work trips.  I swung by the airport and grabbed Hubs and we arrived back home around 11pm.  He spotted that 3D swell area behind the sink while getting a drink right before bed.

It almost caused a huge fight.

It was so big you could see it from the front (may be the first time that phrase was used not in reference to a large butt).

I know that the brown is gross behind that faucet.. The main part of it is putty from putting the sink back in that hadn’t got cleaned off yet.. because the countertops weren’t done for that long.  Then some of it is just gross dirt around a gross kitchen faucet.  That thing was so filthy (spoiler alert we’ve since replaced it) that every time I’d clean it more dirt would seep out of it and take the old dirt’s place.  Marinara monster – I swear it.

Anyhow, Hubs touched the sink tumor and it was soft to the touch and then chipped right off.

We resolved right then and there to rip them off and replace the concrete with laminate.

(I have other pics of other holes that developed.  For instance, we had a run of the mill knife block sitting to the left of the oven.  When we picked it up to move it, it ripped a bunch of the concrete off with it?  Don’t know why.  I can post these pics if people like, but it’s truly overkill in my head.  If you don’t get the idea by now, I am sure its just because you are blaming us for it not working haha)


Stay tuned.
 

Before, During, Progress, Kitchen, etc.

As I gather up my half-assed pictures of the kitchen reno at every step I have realized a few things. They all boil down to one thing: I need to take better pictures.  For starters, I am not the best photographer.  But there’s also the fact that I never bothered to clean off the countertop for any of the pics.  It’s always full of chaos.  In fact, I don’t even have a picture of the full kitchen post painting the countertops.  God only knows why.  So, to the best that I’ve equipped myself, here’s three pictures of our kitchen along the way, with a quick cap of what changed in between.

Progress Shots

Progress Shots

I seriously need to work on my photography skillz.

Our kitchen to do list looks like this now with this update–

  • Prime, paint, and seal the cabinets. (we opted to not seal)
  • Buy new hardware and add it to the cabinets (duh)
  • Paint the walls and ceiling
  • Re-do the countertop (either paint or re-laminate)
  • Re-redo the countertop again (surprise surprise!)
  •  
  • Finally finish installing the big light (it needs a sealing gasket thing installed, but we couldn’t find it for awhile lol)
  • Replace the under cabinet light
  • Find a permanent solution for the trash and recycle bins (on our way!)
  • Make the upper corner shelf open shelving (just have to add the shelves back in – more on that later)
  • Paint the new open shelving in the corner (still have to paint the actual shelves + maybe a pattern in the background + hang the shelves)
  • Possibly replace the above-window light
  • Add some sort of curtains to the window and the door
  • Strip and repair the doors to the outside and to the basement
  • Paint the doors to the outside and the basement
  • Bright gloss white paint on the trim and doors
  • Create a family command center on the big open wall that includes a calendar, mail center, meal planner, and anything else we may find useful.
  • Add a light in the little nook where the doors are?
  • Decorate.
  • Enjoy.

So here’s where we are now…

Completed Kitchen Floor

Completed Kitchen Floor

So happy with this finished step!