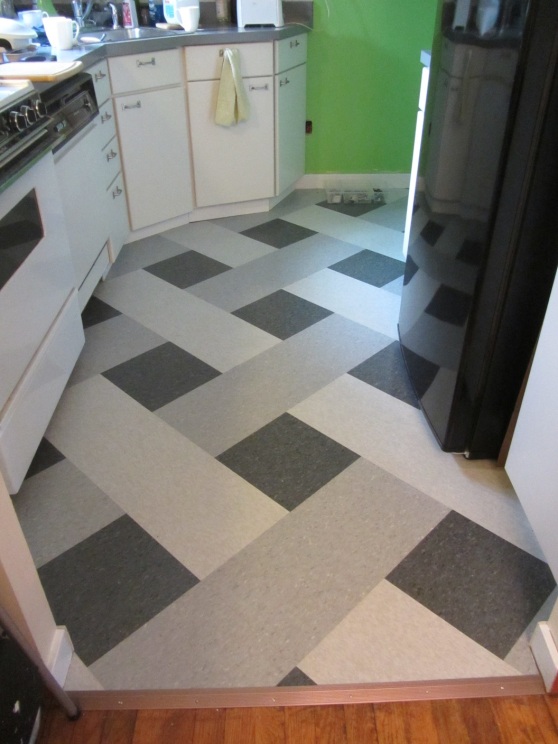
Kitchen Floor – Tile Colors Used (I THINK)

Finished Floor

Finished Floor

I have gotten a few comments requesting that I share the color of the VCT Tiles.. duh I should have totally thought about that.

I am so bad at this blogging thing.

The problem is that I only have one of the three boxes left downstairs, so I am 100% positive on one of these colors and 95% positive on the other two. I looked at the order on Lowes.com and picked the other two out of the order history and am pretty sure that its right.

So without further adieu… These link to the exact link of them on Lowes that I purchased them from.  Lowes has excellent customer service and are becoming my favorite more and more over HD.

The first one is the one I am for sure about (because I still have the box)-

Armstrong 12-in x 12-in Charcoal Speckle Pattern Commercial Vinyl Tile

Armstrong 12-in x 12-in Charcoal Speckle Pattern Commercial Vinyl Tile


Armstrong 12-in x 12-in Soft Cool Gray Chip Pattern Commercial Vinyl Tile

Armstrong 12-in x 12-in Soft Cool Gray Chip Pattern Commercial Vinyl Tile


Armstrong 12-in x 12-in Shadow Blue Speckle Pattern Commercial Vinyl Tile

Armstrong 12-in x 12-in Shadow Blue Speckle Pattern Commercial Vinyl Tile


Also, I wanted to take the time to thank everybody for the feedback about the kitchen.  It’s very inspiring to keep working.  I’ve been so busy and I haven’t quite got there, but I am truly trying.  Thanks for the encouragement!

Before, During, Progress, Kitchen, etc.

As I gather up my half-assed pictures of the kitchen reno at every step I have realized a few things. They all boil down to one thing: I need to take better pictures.  For starters, I am not the best photographer.  But there’s also the fact that I never bothered to clean off the countertop for any of the pics.  It’s always full of chaos.  In fact, I don’t even have a picture of the full kitchen post painting the countertops.  God only knows why.  So, to the best that I’ve equipped myself, here’s three pictures of our kitchen along the way, with a quick cap of what changed in between.

Progress Shots

Progress Shots

I seriously need to work on my photography skillz.

Our kitchen to do list looks like this now with this update–

  • Prime, paint, and seal the cabinets. (we opted to not seal)
  • Buy new hardware and add it to the cabinets (duh)
  • Paint the walls and ceiling
  • Re-do the countertop (either paint or re-laminate)
  • Re-redo the countertop again (surprise surprise!)
  •  
  • Finally finish installing the big light (it needs a sealing gasket thing installed, but we couldn’t find it for awhile lol)
  • Replace the under cabinet light
  • Find a permanent solution for the trash and recycle bins (on our way!)
  • Make the upper corner shelf open shelving (just have to add the shelves back in – more on that later)
  • Paint the new open shelving in the corner (still have to paint the actual shelves + maybe a pattern in the background + hang the shelves)
  • Possibly replace the above-window light
  • Add some sort of curtains to the window and the door
  • Strip and repair the doors to the outside and to the basement
  • Paint the doors to the outside and the basement
  • Bright gloss white paint on the trim and doors
  • Create a family command center on the big open wall that includes a calendar, mail center, meal planner, and anything else we may find useful.
  • Add a light in the little nook where the doors are?
  • Decorate.
  • Enjoy.

So here’s where we are now…

Completed Kitchen Floor

Completed Kitchen Floor

So happy with this finished step!

Removing old Vinyl/Lino Tile

Today we will talk about the steps we used to remove the old, cracked, filthy tiles in our kitchen.   It’s a lot of work, time wise, but not really muscle-wise.  I shouldn’t really comment on that since I had minimal involvement with it, but I will say that all that bending over really does a number on your back.  So take that in mind. However, as far as DIY goes, it’s simple and you probably have the skills needed to pull it off.

Our Original Kitchen Flooring

Our Original Kitchen Flooring

Say bye bye to that old floor.

First, gather your supplies:

  • Knee pads (optional, but not really optional)
  • Adhesive Remover
  • Gloves
  • Putty Knife/Scraper
  • Iron (or I suppose a heat gun would work, but we used our iron – which, be forewarned, was ruined & had to be replaced.  We also used a hair dryer in some places, but the iron worked best.)
  • Plastic sheeting (just the cheap stuff they sell in the paint department – like we used to cover out cabinets when we painted out countertops)
  • A bucket (that you will fill with soap & water)
  • Scrub brush
  • Time (I’d say, a weekend – depending on the area of your floor)


Admittedly, I did not take very many pictures of this process.  It went by pretty quickly and it’s really quite self-explanatory.  Here are your basic steps:

  1. Place the iron on top of the tile to be removed.  Keep the iron moving.  The heat from the iron (or heat gun or hair dryer) liquifies the adhesive and the tile will come loose.
  2. Put your putty knife/scraper under the edge of the tile and separate the tile from the floor.  If it doesn’t come up easily, put the iron over it for a little longer.  Just keep rotating between ironing the tile and scraping underneath the tile until you’ve easily removed it.  After the first couple tiles, you’ll find your sweet spot.
  3. Once you’ve got a few tiles up (Kevin removed about six 12 inch tiles at a time), put on your gloves & cover your freshly uncovered subfloor in the adhesive remover.  Be generous.  This stuff looks like almost-clear snot.  We put on a nice 1/4 to 1/2 inch thick layer of it.
  4. Cover your adhesive remover smeared section with the plastic sheeting.  You do this to seal out the air while giving the adhesive remover some time to work.
  5. Wait 15-20 minutes.  (I suppose during this time you could start ironing/scraping up some more tile, but we didn’t.  We just used the time for a nice break.)
  6. After your time has passed, pull up the plastic & discard.  Then, using your putty knife/scraper, scrape up the adhesive remover (and, accordingly, the adhesive).
  7. With fresh soap (we used dawn dish washing liquid) and water, use your scrub brush to scrub the floor.  I wouldn’t even go so far as to say “scrub vigorously” – just scrub it up.  This gets the remaining adhesive off and cleans the floor up nice.
  8. Repeat these 7 steps until the entire floor is done.  Be sure to let your entire floor dry before proceeding to the next step of “leveling the floor” and subsequently “installing the new floor.”


It should be noted that the ironing/heating element is not really necessary.  You can just scrape up the old tiles, but then you risk damaging your subfloor.  We wanted to keep and reuse our subfloor, but if this is not an issue for you (you already plan to replace the subfloor), then you can just scrape away.


Simple!  Voila!  Do you have any tips/questions/etc?


Stay tuned for our tips on leveling the floor, installing the floor, and the big reveal!


Funny Flooring Pun.

As mentioned yesterday, it’s been a huge long while since I’ve updated this blog (sorry again), so I am way out of practice on my home reno related puns.  Let’s pretend this post is titled funny.

When we last addressed the kitchen floor (here) way back in September, I mentioned that our plan included the keyword of “cheap”  – and I’d say we nailed it.

First, lets look at what our kitchen came with in the way of flooring…

Our Original Kitchen Flooring

Our Original Kitchen Flooring

Who doesn’t love pink, filthy, chipping linoleum tile from however many decades ago?

Oh, me.

So in that post way back in September, I listed out about a dozen different ideas we had running through our minds, but we eventually settled on vct tile.  We had our reasons, but the real reason we just went for it was my stumbling upon this post at design*sponge that just had the most fabulous cheap floor ever.  I was immediately obsessed.  To me, it was just the perfect floor with huge visual impact and in our price range (Under $1.50/sq.ft).

So I started to research VCT Tiles and what I found out sealed the deal.  As it turns out, they were way under budget (Around 75cents/sq.ft).  Also, they came in a huge rainbow of colors and I could customize to exactly what I wanted.  Originally, my heart/head said I wanted grey (to match the cabinets and backsplash), white (the neutral), and a pretty blue (because, thats just where my head went).  I went to Home Depot and on about 10 different occasions asked somebody in the flooring department to help me with VCT tile ordering & nobody ever knew what I was talking about to help me.  I would literally be standing in front of the big poster they have at home depot telling you to “custom order VCT tile” and the worker would tell me that wasn’t possible. So I gave up on that and went home to order it online.  However, Home Depot’s website was even less helpful than their store workers.  As a result, for this project, I switched teams and ordered from Lowes.com.

If you search VCT on Lowes.com, you’ll come with about 300 (I don’t even think thats over-exaggerating) results.  Be cautious, some of them are ridiculously priced (I still haven’t figured out why, but I didn’t really look into it- I just didn’t order any of those ones).  I ended up ordering about 14 different colors – a few each of blue, grey, and white – because I couldn’t decide based on what my monitor was showing what would look right in the kitchen.  And it’s a good thing, too, because the ones I would’ve swore were perfect ended up being horribly horribly wrong.  The whole bill ended up being north of $450. I called Lowes and double checked that whatever tiles I decided I didn’t want, I could return & was triple-ensured that was the case.

About a month later, we got the call that our tile order was waiting for us at Lowes.  We headed down and loaded up our haul.  I never considered how heavy these tiles could be.  I actually didn’t think they would be heavy.  I was wrong.  I couldn’t lift a single box.  I won’t even try to wager how much they weighed, but our small Corolla was quite the low rider.

When we got them home, we quickly realized that the colors I had previously had my heart set on were wrong.  But first, we tried out a ton of different patterns to make sure it wasn’t the pattern’s fault it looked awful.  Spoiler alert: it was my color choice.

Here are some of the patterns we ran through, just in case you’ve stumbled upon this entry in hopes of finding VCT floor patterns.

This slideshow requires JavaScript.

Eventually I realized it was the colors that were all wrong and switched them out to be something much more subtle and classy.   More on that, soon!


Let’s Talk Cheap, Temp Flooring

Our Current Kitchen Flooring

Our Current Kitchen Flooring

Look at that awesome floor!  That’s what’s currently in our kitchen.  There is no doubt about it that whoever did the last major reno to this house loved pink.  We have pink countertops, an entire pink bathroom that feels like a ceramic womb, pink floors, pink window ledges, pink walls.  There is no end to the pink.  But for now, lets just focus on that floor.  At a distance, say standing up and just looking at it, it’s ugly, but you can’t tell that it’s actually that filthy until you get down close to it.  Granted this picture is from underneath the fridge.  But you get my point.

So what are we considering?

Well we know for sure we are going to rip out those stick on tiles.  Thanks to the above picture we can see what’s underneath it and no part seems to be “soft” as we walk on it (and trust me I walk heavy) so we should just be able to put the new floor down on top of the existing subfloor.

We also know that we are aiming for “cheap, yet modern and stylish.”  The cheaper the better without compromising the looks too much.  We want this kitchen update to satisfy us for about 5 years and then we hope to gut it and rip out walls and have a much more open floor plan.  So we are not opposed to vinyl or laminate.  However, we are opposed to tile because it hurts the feet. Plus who wants to clean grout?  Not this girl.

These are some options and ideas that I’ve bookmarked and perused.  (For an ongoing and up to the minute look into my brain, follow me on pinterest! http://www.pinterest.com/jessiedrm – nobody pins harder than I do)

First off, I am pretty obsessed with laying the floor in a herringbone pattern.  However, with the options of actual flooring we are considering, I don’t think this is possible based on the size of the planks/tiles vs. the size of our kitchen.  The scale is off.  I am still brainstorming on whether or not this is possible, though, so it’s still in the running.

Herringbone Patterned Floor #1

Herringbone Patterned Floor #1

Herringbone Patterned Floor #2

Herringbone Patterned Floor #2

Originally, the plans were for a grey floor, but now we are unsure.  I also really love Home Depot’s fake cork options.  The end real kitchen update in ~5 years has a planned cork floor in my head, but as of right now, fake cork-look is much more in the budget.   We don’t want wood because the rest of the house is wood and it’d be killer to try to match up.  Plus, it seems like it’d be a lot of work to maintain in a kitchen.  Here are pics and links to the options we’ve been discussing:

TrafficMaster Ceramica 12 in. x 24 in. Coastal Grey Vinyl Tile Flooring (30 sq. ft./case)

TrafficMaster Ceramica 12 in. x 24 in. Coastal Grey Vinyl Tile Flooring (30 sq. ft./case) at Home Depot for $1.69/sq.ft.

Armstrong Imperial Texture 12 in. x 12 in. Classic White Standard Excelon Vinyl Composition Tiles (45-Pack)  for $0.73/sq. ft.

Armstrong Imperial Texture 12 in. x 12 in. Classic White Standard Excelon Vinyl Composition Tiles (45-Pack) for $0.73/sq. ft. – but NOT in this classic/retro checkered pattern, but still patterned in someway

TrafficMaster Allure 6 in. x 36 in. Lisbon Cork Dark Resilient Vinyl Plank Flooring (24 sq. ft./case) for $1.99/sq.ft

TrafficMaster Allure 6 in. x 36 in. Lisbon Cork Dark Resilient Vinyl Plank Flooring (24 sq. ft./case) for $1.99/sq.ft – This is a terrible picture. Who has a bright orange kitchen?

TrafficMaster Allure 6 in. x 36 in. Natural Cork Resilient Vinyl Plank Flooring (24 sq. ft./case) for $1.99/sq.ft.

TrafficMaster Allure 6 in. x 36 in. Natural Cork Resilient Vinyl Plank Flooring (24 sq. ft./case) for $1.99/sq.ft.

TrafficMaster Allure 6 in. x 36 in. Natural Cork Resilient Vinyl Plank Flooring (24 sq. ft./case) for $1.99/sq.ft.

TrafficMaster Allure 6 in. x 36 in. Natural Cork Resilient Vinyl Plank Flooring (24 sq. ft./case) for $1.99/sq.ft.


There are also some considerations from Lowe’s, that d0n’t have “room views” —

Cryntel 12" x 12" Ebony Marble Finish Vinyl Tile for $0.88 each

Cryntel 12″ x 12″ Ebony Marble Finish Vinyl Tile for $0.88 each

Style Selections 18"x18" Aspen Gray Stained Concrete for $2.21 each

Style Selections 18″x18″ Aspen Gray Stained Concrete for $2.21 each

Style Selections 12" x 12" Crescendo Marble Gray Marble Finish Luxury Vinyl Tile for $1.13 each

Style Selections 12″ x 12″ Crescendo Marble Gray Marble Finish Luxury Vinyl Tile for $1.13 each

Congoleum 16" x 16" Quartz White Stone Granite Finish Luxury Vinyl Tile at $73.04 each case of 10 tiles

Congoleum 16″ x 16″ Quartz White Stone Granite Finish Luxury Vinyl Tile at $73.04 each case of 10 tiles

Congoleum 16" x 16" Quartz Midnight Granite Finish Luxury Vinyl Tile at $73.04 for a case of 10 tiles

Congoleum 16″ x 16″ Quartz Midnight Granite Finish Luxury Vinyl Tile at $73.04 for a case of 10 tiles


As you can see, the choices are wildly variable and we’ve got a long way before we make a decision.  We like to mull over things until we’re sick of thinking about them then we just make some sort of snap decision like it shoulda and coulda been made in 10 minutes lifetimes ago.